How to send files
After logging in for the first time, you’ll be brought to the safedrop compose page.
To send a safedrop
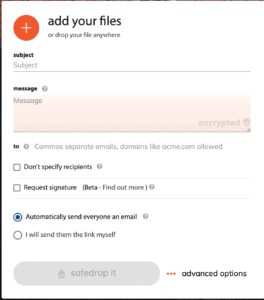
1. Add your files
You can do this by drag and drop or by clicking the orange + sign to open a file search box to add the files from your device this way.
2. Enter your safedrop subject and message
The message can be encrypted to only be shown when the recipient has been verified and the safedrop accessed. (more on encryption below).
Nb. You can leave these blank if you’re sending a document.
3. Enter your recipient’s email/s and hit the enter button or select ‘Don’t specify recipients’
You can send a safedrop to multiple recipients at once by seperating their email addresses with a comma and then hitting enter once you’re done, or by entering each address in one by one, hitting ‘Enter’ after each address.
4. Esign
You can choose if a document requires a signature from either yourself or your recipients at this stage this will allow a signature page to be added to the document and everyone will be sent a copy of the document for signing
5. Choose how the safedrop will be sent
‘Automatically send everyone an email’ will send the recipients an email directly from our service with the link to access the drop. ‘I will send them the link myself’ will generate a link for you to copy and paste into an email, put on a notice board or however you like.
6. Advanced options
Clicking this button will open a pop out box and here you can set your safedrop security settings.
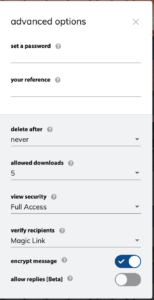
Password – The sender can set a password on the safedrop as an extra layer of security. We recommend sending the password to the recipient via a method other than email for security reasons (whatsapp, SMS, phone call for example)
Reference – This can be used as a tag or Internal reference for your audit trail.
Delete after – This option sets the expiry time of your safedrop. You can set this from 1 hour expiry up to never.
Allowed downloads – This selects the number of times your recipients can view/download your files before the safedrop expires. If this is set to 1 then the safedrop will be expired after the first download. This is a ‘self destruct’ safedrop.
View security – You can choose between ‘Full access’ and ‘View on screen’. ‘Full access‘ allows your recipients to download the files and ‘View on screen‘ only allowing them to view the files in our secure previewer.
Verify recipients – You can either select ‘Off’, ‘Enter Email Address’ or the ‘Magic Link’ option.
Choosing ‘Off‘ will not verify your recipients so that anyone who recieves the link will be able to access the safedrop.
‘Enter Email Address‘ – The safedrop recipient must first enter their email address before accessing the safedrop.
‘Magic Link‘ – When recipents go to view their safedrop, they will be sent a link by email. They will have to click the link or enter the code to access the safedrop.
Encrypt Message – Selecting this option will hide the safedrop message body from the recipient until they actually access the safedrop. The message will not be shown in clear text in any emails sent out from the system. If the option remains unticked, the message will be shown in the emails sent from the system.
Allow replies [Beta] – This feature, available only when Magic link verification has been selected, allows the safedrop recipients to reply and attach files to the safedrop. Those files are then viewable and downloadable by both the original safedrop sender and all recipients.
6. Click ‘safedrop it’ button.
Clicking the safedrop it button will send the drop according to your selected settings. The button will will turn orange and become clickable once some text has been added to the message box OR a file is uploaded to the safedrop.
If you selected ‘ I will send them the link myself’ or the ‘Don’t specify recipients’ option, after you click the safedrop it button, you will be directed to a summary page where you are given a quick rundown of the safedrop you just created and the safedrop link. You can then copy and paste the link in an email or on a message board or any other send it to the the recipient using any other method.
If you selected ‘Automatically send everyone an email’, after you click the safedrop it button, you will be directed to a summary page where you will see all the settings applied to your drop including the expiry date and number of downloads/views allowed.
The settings you choose will be remembered the next time you login.
How to track safedrops (paid accounts)
To view a list of all your sent safedrops, click on the ‘Track Safedrops’ button along the top bar.
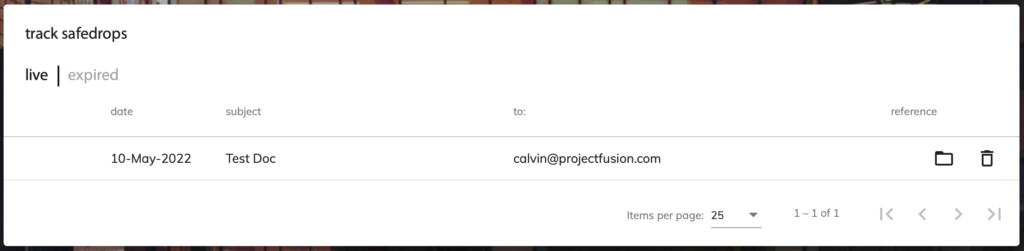
As you can see above, each of your safedrops will be shown here. You can see the date sent, the subject of the safedrop, the recipient email addresses and any reference that the drop had.
Clicking on one of the safedrops will open up it’s audit menu showing it’s expiry date, recipients, subject and message, security settings and attachments.
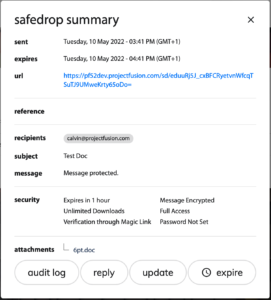
Clicking on ‘audit log’ will open up the safedrop audit showing all actions for that safedrop.

Clicking on ‘expire safedrop’ will expire the safedrop and prevent the recipient from accessing it any further.
You will then receive a summary safedrop email showing if your safedrop was downloaded or viewed and when.
In the track safedrops page, just above the table headings, you can click from ‘live’ to ‘expired’ to view all expired drops. Drops will stay here until deleted or until your predetermined audit retention time runs out.
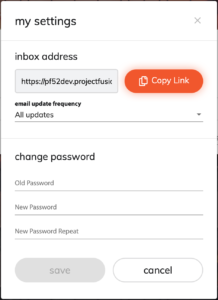
How to change your password
If you have forgotten your password then you can request a password reset from the login page by clicking the Forgotten username or password? button.
If you have logged in but would like to change your password, Click ‘my settings’ at the top right of the room. You will then be able to change your password.